Some crochet projects just have that instant “oh, this is going in a baby shower gift basket” feeling, and this hungry little caterpillar crochet pattern is definitely one of them.
It is bright, cheerful, soft, and wonderfully nostalgic — the kind of handmade toy that looks adorable tucked beside a children’s book, wrapped with a ribbon, or sitting on a nursery shelf. It also happens to be a brilliant stash-busting crochet project, because all those half-balls of green yarn hiding in the bottom of your basket finally get a proper job to do.
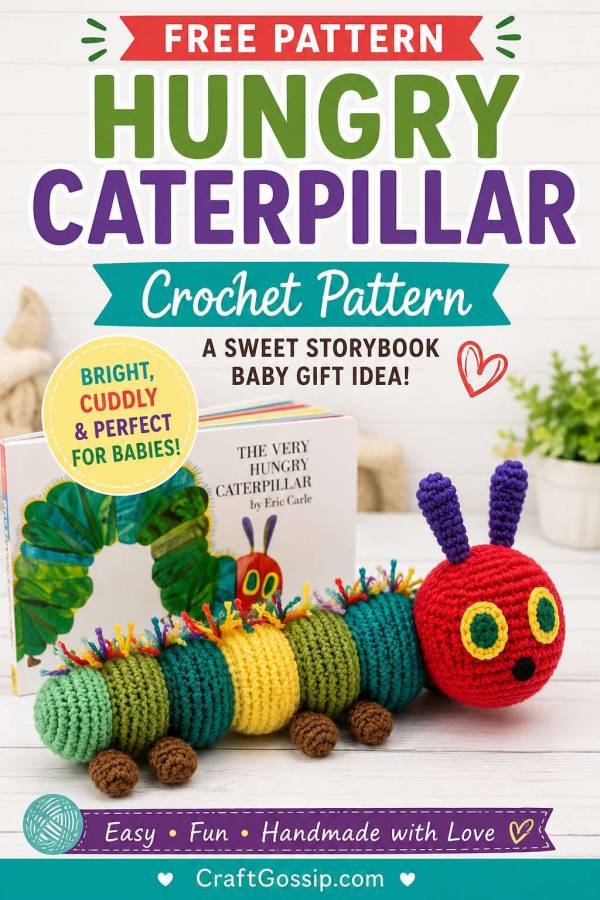
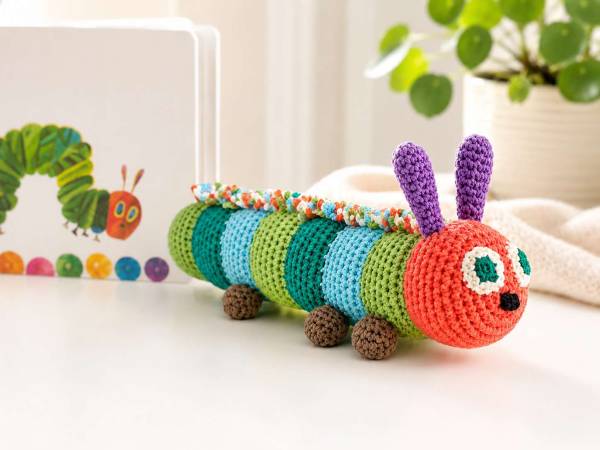
This sweet caterpillar is made with a red head, rounded green body segments, little brown feet, purple antennae, stitched eyes, and colourful yarn fuzz along the back. It has that playful storybook look without being overly complicated, which makes it a lovely project for crocheters who enjoy amigurumi-style toys but don’t want anything too fiddly.
A Sweet Crochet Baby Gift With Storybook Charm
Handmade crochet toys make such thoughtful baby gifts because they feel personal without needing to be overly fancy. This caterpillar would be lovely paired with a board book, a soft baby blanket, or even tucked into a “first library” gift basket for a new baby.
The finished caterpillar measures around 12 inches long, depending on your yarn, hook size, and how firmly you stuff it. That makes it big enough to feel gift-worthy, but not so large that it becomes a never-ending project. We all know those “quick makes” that somehow take three weeks and half your sanity — this one is much more manageable.
What You’ll Need To Make The Caterpillar
This caterpillar uses DK yarn and a 3.5 mm crochet hook, which gives the stitches a nice firm texture for stuffing. You will need red yarn for the head, several shades of green for the body, brown for the feet, purple for the antennae, yellow and green for the eyes, and small scraps of colourful yarn for the fuzzy top.
This is a great project for using yarn leftovers. The body actually looks better when the green shades vary slightly, so don’t worry if your yarns are not a perfect match. A mix of lime, moss, teal, mint, and leafy green gives the caterpillar a lovely handmade look.
For baby-safe making, I would recommend embroidering facial details rather than using plastic safety eyes. A stitched face feels softer, washes better, and is a safer choice if the toy may be handled by very young children.
If you are restocking supplies, a washable DK acrylic or cotton-blend yarn works well. Mary Maxim is handy for colourful yarns and crochet kits, while Amazon is useful for toy stuffing, stitch markers, ergonomic hooks, and yarn needles.
Why This Crochet Caterpillar Is A Lovely Stash-Buster
One of the best parts of this pattern is that it doesn’t demand a perfect colour palette. In fact, the caterpillar looks more playful when the body segments are worked in different greens and blues.
That makes it a very satisfying scrap yarn crochet project. You can use small leftovers from previous baby blankets, amigurumi toys, or blanket borders. The little yarn fuzz along the back is another perfect scrap-buster because you only need short strands of yarn in bright colours.
It is always a good day when the oddments basket starts looking like a creative design choice rather than evidence of a yarn-buying habit.
How The Caterpillar Is Made
The caterpillar is worked in amigurumi-style rounds, beginning with the red head and continuing into the body. The body sections are shaped with increases and decreases to create rounded segments.
The feet are made separately and sewn underneath the body. The eyes are small crocheted circles, the antennae are lightly stuffed tubes, and the colourful back fuzz is added at the end by knotting short yarn strands into the top stitches.
You will need to know how to:
Work in continuous rounds
Single crochet
Increase and decrease
Change colours
Stuff crochet pieces
Sew amigurumi parts together
Add simple embroidered details
The stitches themselves are beginner-friendly, but the project does involve assembly, so I would call this a confident beginner crochet pattern rather than an absolute first project.
Tips For A Neater Finished Caterpillar
Use a stitch marker at the start of every round. With amigurumi, it is very easy to lose your place, especially when the rounds are small and the yarn colours are changing.
Stuff the body gradually as you work. Once the caterpillar becomes long, it is much harder to push stuffing evenly into the earlier sections. Add small amounts at a time and shape each segment gently with your hands.
Keep the stuffing firm but not overpacked. Too much stuffing can stretch the stitches and make the body look lumpy.
Pin the eyes and antennae before sewing. A tiny shift in eye placement can completely change the expression, so it is worth taking a minute to get the face looking right.
Trim the yarn fuzz after attaching it. The colourful back ridge looks much tidier once all the strands are trimmed to an even length.
Colour Variations To Try
The classic red-and-green caterpillar look is cheerful and instantly recognisable, but you can easily adapt the colours to suit your gift.
For a softer nursery version, try sage green, mint, pale aqua, butter yellow, and coral. For a brighter toddler toy, use lime, teal, turquoise, orange, and purple. A rainbow caterpillar would also be adorable, especially for a preschool classroom or storytime prop.
You could even make a garden-themed version in earthy greens and browns, or a pastel baby shower version with cream, blush, mint, and lavender.
Baby Gift Ideas Using This Pattern
This caterpillar would make a beautiful handmade gift on its own, but it is even sweeter as part of a themed bundle.
You could pair it with:
A favourite children’s board book
A handmade baby blanket
A crochet baby hat
A set of soft washcloths
A nursery basket
A storytime gift set
A baby shower hamper
For a bigger handmade present, pair it with a simple crochet blanket. If you need more inspiration, take a look through CraftGossip’s crochet baby gift ideas for projects that work well together.
Is This Crochet Pattern Beginner Friendly?
Yes, with a little patience.
The main body uses basic crochet shaping, but because it is a stuffed toy, you will need to pay attention to stitch counts and finishing. The sewing and shaping are what make the project look polished.
If you are still new to amigurumi, take your time with the assembly. Don’t rush the face. Don’t overstuff the body. And definitely don’t skip the stitch marker unless you enjoy counting backwards with a cup of cold tea beside you.
A smaller hook helps create tighter stitches, which keeps the stuffing from showing through. If your stitches look loose, drop down half a hook size.
Why I Love This Project
This is such a happy little crochet project. It is colourful, giftable, and full of personality without being too complicated. It also has that lovely nostalgic feel that makes it perfect for baby showers, nursery decor, and handmade storybook gifts.
It is practical too. You can use washable yarn, small scraps, and basic supplies you probably already have. The finished toy feels special, but the making process is still simple enough to enjoy.
And honestly, any project that lets me use seven different green yarn scraps and call it “intentional colourwork” is a win.