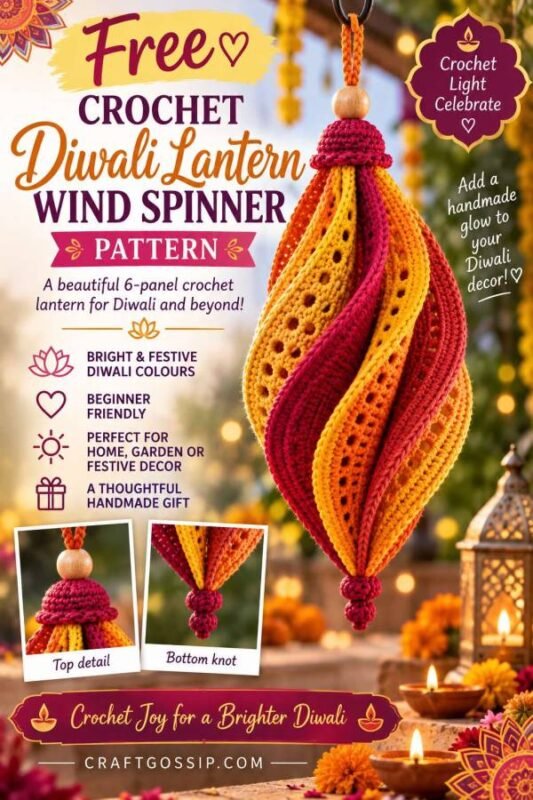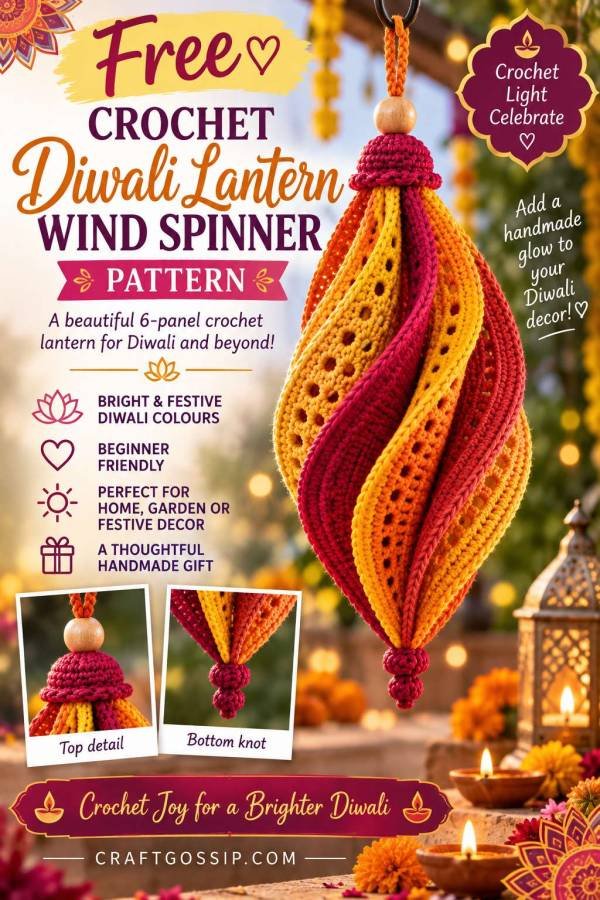
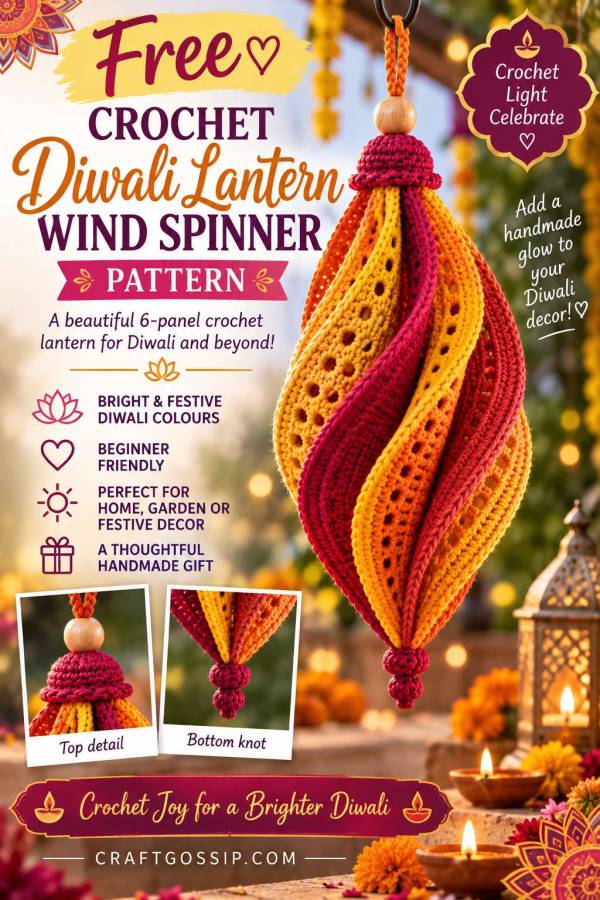
There is something about Diwali decorating that gives colour permission to really show off.
Saffron orange, hot pink, turquoise, deep purple, marigold yellow, ruby red and flashes of gold can all sit happily together, and somehow the more vibrant the combination becomes, the better it seems to work.
That is exactly why this crochet Diwali lantern wind spinner pattern caught my eye.
The original design is a six-panel twisted crochet wind spinner, but worked in a bright Diwali-inspired palette it takes on the wonderful shape and movement of a festive hanging lantern. Six long leaf-shaped crochet panels are joined at the top and bottom, then gently twisted around one another to create a three-dimensional hanging decoration.
There is no light or candle inside this one, so think of it as a crochet lantern-inspired hanging decoration rather than an illuminated lantern. Hang it near your doorway, veranda, window, covered patio or alongside strings of lights and it becomes a colourful reusable decoration for the Festival of Lights.
And unlike paper decorations that may only survive one celebration, this one can be packed away and brought out again next year.
I would work the six panels in fuchsia pink, marigold orange, saffron yellow, turquoise, royal purple and ruby red, then finish the top with a gold or wooden bead. You could even add a few tiny bells or gold beads at the bottom if you want a little extra festival sparkle.
If you are planning more handmade decorations, our free Amma’s Diwali Toran crochet pattern would look beautiful across the same doorway, while the Festival Starburst Crochet Ornament is another great little stash-busting Diwali crochet project.
The crochet construction below follows the six-panel twisted wind spinner design in the supplied pattern.
Crochet Diwali Lantern Wind Spinner Pattern
Skill level: Beginner to confident beginner
Crochet terminology: US terms
Finished hanging length: Approximately 13 to 15 inches or 33 to 38 cm
Crochet body: Approximately 10 to 11 inches or 25 to 28 cm
Widest point: Approximately 4 to 5 inches or 10 to 13 cm
Hook: 3.5 mm crochet hook
The finished size may vary slightly depending on your yarn, hook size, tension and how tightly you twist the panels during assembly.
Diwali Colour Palette
For a bright Festival of Lights version, make the six panels in:
Panel 1: Fuchsia pink
Panel 2: Marigold orange
Panel 3: Turquoise or teal
Panel 4: Saffron yellow
Panel 5: Royal purple
Panel 6: Ruby red or deep coral
For the top cap, use fuchsia, ruby red or purple.
Finish with a gold-tone or natural wooden bead.
You could also add a strand of metallic gold thread to one or two panels, but I would keep this optional. The jewel colours are already doing plenty of work.
Materials
You will need DK or light worsted weight cotton or cotton-blend yarn.
Allow approximately:
25 to 30 g for your top cap colour
15 to 25 g of each additional panel colour
You will also need:
3.5 mm crochet hook
1 wooden or gold-tone bead approximately 20 mm for the top
Optional small bead approximately 8 to 12 mm for the bottom
Metal hanging ring or screw eye if desired
Scissors
Measuring tape
Strong matching yarn for assembly
Optional small gold beads or bells
Cotton or cotton-blend yarn works particularly well because it gives the panels enough structure to hold the twisted lantern shape.
It is also a perfect project for leftover DK yarn. Just keep the yarn weights reasonably similar so one panel does not decide to become significantly larger than its neighbours.
Gauge
Using DK or light worsted yarn and a 3.5 mm hook:
16 dc x 9 rows = 4 x 4 inches or 10 x 10 cm
Exact gauge is less important than making all six panels approximately the same size.
Once you have made the first panel, use it as a template for the remaining five.
Crochet Abbreviations
ch = chain
sc = single crochet
dc = double crochet
inc = increase
dec = decrease
dc2tog = double crochet 2 stitches together
dc3tog = double crochet 3 stitches together
st = stitch
sts = stitches
rep = repeat
FO = fasten off
Pattern Notes
You will crochet six leaf-shaped panels.
Each panel is worked from the lower point upwards.
The panel increases gradually, reaches 17 stitches across the widest section, then decreases again to form another point.
The six finished panels are joined only at the top and bottom.
They are then arranged evenly and twisted around one another to form the three-dimensional hanging shape.
Do not sew the panel sides together.
The open spaces between the panels are part of the design and help create the lantern-like appearance.
Crochet the First Diwali Lantern Panel
Make six panels in total.
Use a different jewel-bright colour for each panel.
Row 1
Ch 3.
Beginning in the second chain from the hook, sc in the next 2 chains. (2 sts)
Row 2
Ch 1, turn.
Inc in first stitch.
Sc in next stitch. (3 sts)
Row 3
Ch 1, turn.
Inc in first stitch.
Sc across. (4 sts)
Row 4
Ch 1, turn.
Sc across. (4 sts)
Row 5
Ch 1, turn.
Inc in first stitch.
Sc across. (5 sts)
Continue increasing by 1 stitch at the beginning of every other row until you have 11 stitches.
This creates the long lower point of the panel.
Keep checking your stitch count as you work.
Work the Widest Section
Change to double crochet.
Row 17
Ch 2, turn.
Dc across. (11 sts)
Row 18
Ch 2, turn.
Dc across. (11 sts)
Row 19
Ch 2, turn.
Work 2 dc into the first stitch.
Dc across until the last stitch.
Work 2 dc into the last stitch. (13 sts)
Row 20
Ch 2, turn.
Dc across. (13 sts)
Row 21
Ch 2, turn.
Work 2 dc into the first stitch.
Dc across until the last stitch.
Work 2 dc into the last stitch. (15 sts)
Row 22
Ch 2, turn.
Dc across. (15 sts)
Row 23
Ch 2, turn.
Work 2 dc into the first stitch.
Dc across until the final stitch.
Work 2 dc into the last stitch. (17 sts)
Rows 24 to 28
Ch 2, turn.
Dc in every stitch across. (17 sts)
The panel should now be at its widest point.
Begin Narrowing the Panel
Row 29
Ch 2, turn.
Dc2tog.
Dc across until 2 stitches remain.
Dc2tog. (15 sts)
Row 30
Ch 2, turn.
Dc across. (15 sts)
Row 31
Ch 2, turn.
Dc2tog.
Dc across until 2 stitches remain.
Dc2tog. (13 sts)
Row 32
Ch 2, turn.
Dc across. (13 sts)
Row 33
Ch 2, turn.
Dc2tog.
Dc across until 2 stitches remain.
Dc2tog. (11 sts)
Row 34
Ch 2, turn.
Dc across. (11 sts)
Row 35
Ch 2, turn.
Dc2tog.
Dc across until 2 stitches remain.
Dc2tog. (9 sts)
Row 36
Ch 2, turn.
Dc across. (9 sts)
Shape the Top Point
Row 37
Ch 2, turn.
Dc2tog.
Dc across until 2 stitches remain.
Dc2tog. (7 sts)
Row 38
Ch 2, turn.
Dc across. (7 sts)
Row 39
Ch 2, turn.
Dc2tog.
Dc across until 2 stitches remain.
Dc2tog. (5 sts)
Row 40
Ch 2, turn.
Dc2tog.
Dc across until 2 stitches remain.
Dc2tog. (3 sts)
Row 41
Ch 1, turn.
Dc3tog. (1 st)
Fasten off and weave in the yarn end.
Your panel should now have a long leaf or elongated diamond shape with pointed ends.
Make Five More Panels
Repeat the panel pattern five more times.
For the Diwali version, I would use:
Fuchsia
Orange
Turquoise
Yellow
Purple
Ruby red
Lay the finished panels beside one another as you work.
They should all measure approximately 10 to 11 inches long.
A small difference is fine.
A two-inch difference is usually a sign that one panel has quietly developed its own interpretation of the instructions.
Crochet the Top Cap
Choose one of your deeper colours such as fuchsia, ruby red or purple.
Round 1
Make a magic ring and work 6 sc into the ring. (6 sts)
Round 2
Inc around. (12 sts)
Round 3
Sc 1, inc.
Repeat around. (18 sts)
Round 4
Sc 2, inc.
Repeat around. (24 sts)
Rounds 5 and 6
Sc around. (24 sts)
Round 7
Sc 2, sc2tog.
Repeat around. (18 sts)
Round 8
Sc around. (18 sts)
Round 9
Sc 1, sc2tog.
Repeat around. (12 sts)
Fasten off, leaving a long sewing tail.
The finished piece should resemble a small rounded cap.
Arrange the Six Panels
Lay the six panels together with their top points aligned.
Arrange the colours in the order you would like them to appear.
I like alternating warm and cool colours:
Fuchsia
Turquoise
Orange
Purple
Yellow
Ruby red
This keeps similar colours from disappearing into one another once the panels twist.
Join the Top Points
Using strong matching yarn, sew through all six top points several times.
Keep the points neatly aligned.
Tie securely.
Do not sew down the sides.
The panels need to remain separate so they can twist.
Create the Diwali Lantern Shape
This is the satisfying part.
Hold the joined top firmly.
Allow all six panels to hang downward.
Spread them evenly around the centre.
Starting with one panel, move the lower point slightly to the right.
Move the next panel slightly farther around.
Continue working around the six panels.
The pieces will begin wrapping around one another.
Continue gently turning each panel until you have a smooth spiral.
Look at the decoration from all sides.
Adjust the panels until the six colours are evenly distributed.
Do not twist them too tightly.
A slightly open spiral produces a fuller, more lantern-like shape.
Join the Bottom Points
Bring the six lower points together.
Align the tips.
Using strong matching yarn, sew through all six points several times.
Tie securely.
The twisted body should now hold its shape.
Attach the Top Cap
Place the crochet cap over the joined top points.
The rounded section faces outward.
Using the long yarn tail, sew around the lower edge of the cap, catching the panel tops underneath.
Keep the stitches small and discreet.
The top cap gives the hanging decoration a much neater finished appearance.
Add the Top Bead
Thread the hanging cord or strong yarn through your bead.
For the Diwali version, a gold-tone bead is particularly effective.
A natural wooden bead also works beautifully if you prefer a slightly more understated finish.
Position the bead directly above the crochet cap.
Make the Hanging Loop
Cut approximately 10 to 12 inches or 25 to 30 cm of strong yarn or cord.
Fold it in half.
Pass the folded section through the bead.
Bring the loose ends through the loop and pull firmly.
Twist or braid the loose ends together.
Create a strong loop for hanging.
Secure the loose ends underneath the bead.
If you plan to hang the decoration somewhere breezy, attaching a small swivel or metal hanging ring can help it rotate more freely.
Make the Bottom Decoration
The source design uses a small decorative red crochet knot or ball beneath the six joined points.
For the Diwali version, you can keep that simple finish or add a little extra festival detail.
Try:
A small crochet ball
Gold bead
Tiny bell
Short tassel
Gold thread tassel
Small cluster of beads
For a simple crochet ball:
Round 1
MR, 6 sc. (6 sts)
Round 2
Inc around. (12 sts)
Round 3
Sc around. (12 sts)
Round 4
Dec around. (6 sts)
Stuff very lightly.
Fasten off and close.
Sew the ball securely underneath the joined panel points.
Optional Gold Details
If you want to push the Diwali look a little further without altering the construction, add a few small gold details after assembly.
You could:
Sew one tiny gold bead near the centre of each panel.
Add metallic embroidery along the panel edges.
Attach a tiny bell underneath the bottom knot.
Use gold thread for the hanging loop.
Add a gold bead above and below the crochet body.
I would not add too much.
The six bright colours already create the main visual impact.
Blocking the Finished Decoration
If the panels do not sit evenly after assembly, lightly mist the crochet with water.
Use your hands to arrange the twist.
Hang the decoration somewhere protected and allow it to dry naturally.
Do not flatten the panels.
You simply want to encourage them into smooth, even curves.
Where to Hang Your Crochet Diwali Decoration
This lantern-inspired wind spinner would look lovely hanging:
Beside your front doorway
From a covered veranda
In a sunny window
Under a pergola
From a balcony
Alongside a Diwali toran
Among fairy lights
Above a festive table
From hooks across an entryway
Several at slightly different heights would make an especially striking display.
Just remember that this is a yarn decoration rather than an actual illuminated lantern.
Keep it well away from open flames, candles and diyas.
Pair it with battery-operated fairy lights rather than putting a light source inside the crochet.
Crochet a Coordinating Diwali Toran
If you are decorating the entrance to your home, this spinner would work beautifully beside our free Amma’s Diwali Toran crochet pattern.
That pattern uses colourful granny squares, tassels and beads to create a traditional-inspired doorway decoration, and the same jewel-bright yarn palette can be repeated in both projects.
Imagine the toran stretched across the doorway with one of these twisted crochet decorations hanging on either side.
That is the sort of handmade entrance that makes me want to immediately pull every bright yarn ball out of the cupboard.
More Diwali Crochet Decorations
You might also like our Festival Starburst Crochet Ornament.
The little starbursts use jewel-bright shades of purple, orange, aqua and pink and can be used as hanging ornaments, gift tags or even joined into a garland. They are especially useful for using up the smaller scraps left after making the six panels for this project.
Can I Change the Number of Panels?
You can experiment, but the original design uses six panels, and that is what creates the balanced shape shown here.
More panels will produce a denser lantern.
Fewer panels will make the body more open.
For your first one, I recommend sticking with six.
Can I Make a Longer Diwali Lantern?
Yes.
The easiest way is to add extra straight rows through the widest centre section of every panel.
Whatever adjustment you make to the first panel must be repeated exactly on the other five.
Matching panel length is essential for an even spiral.
Can I Use Acrylic Yarn?
Yes.
Acrylic works nicely for indoor decorating.
Cotton or a cotton blend tends to give the finished panels more definition and structure, which is why it is my preference for hanging decorations.
Can It Be Used Outdoors?
Use it in a covered outdoor area rather than leaving it permanently exposed to weather.
A veranda, balcony or sheltered doorway is ideal.
Bring it inside during heavy rain.
If you want a wind spinner made specifically with more weather-resistant materials, our roundup of 9 crochet wind spinner patterns and tutorials includes outdoor-oriented options.
A Note About Calling It a Diwali Lantern
This pattern does not contain a light source.
“Diwali lantern” here describes the colourful elongated hanging shape and the way we are styling the original wind spinner for Festival of Lights decorating.
Do not place a candle, diya or hot bulb inside the crochet.
Use it as a decorative hanging alongside your lights and lamps instead.
That means you get all the colour without asking your yarn to perform duties it was never remotely qualified for.
Why This Pattern Works So Well for Diwali
One of the reasons I like adapting this design for Diwali is that nothing about the crochet needs to be disposable.
Make it once.
Pack it carefully away after the celebrations.
Bring it back out next year.
You can even add another one each Diwali until you have a whole collection hanging together.
And there is no requirement for every decoration to match.
In fact, this is one of those occasions where the fuchsia panel sitting beside the orange panel beside the turquoise panel somehow looks much better than trying to be restrained.
There are times for tasteful neutrals.
A Festival of Lights craft project probably does not need to be one of them.