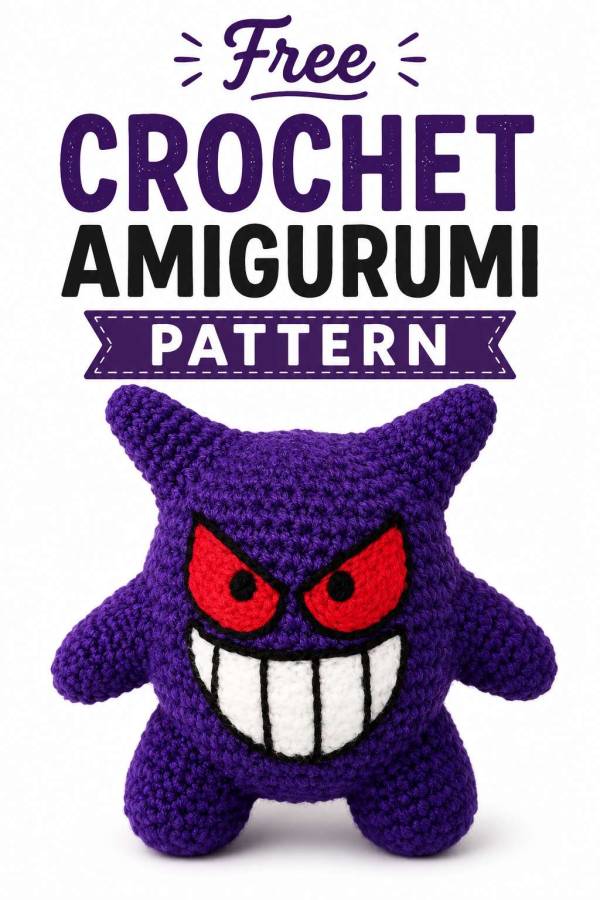
This Gengar-inspired crochet amigurumi pattern is a fun purple ghost-style plush project with pointed ears, little arms and legs, a balancing tail, and a needle-felted mischievous face.
If you love crocheting quirky little characters, this Gengar-inspired amigurumi is one of those projects that is just plain fun to make. It has that cheeky ghostly look, a round purple body, pointy ears, stubby limbs, and a little tail at the back to help it stand upright.
Basically, it is the sort of crochet project that sits on your desk and silently judges your unfinished yarn basket.
This free crochet amigurumi pattern is best suited to crocheters who are already comfortable working in the round, increasing, decreasing, sewing on small pieces, and doing a little shaping. It is not terribly difficult, but there are enough small parts to keep it interesting.
The face is added with needle felting, which gives you lots of room to play with the expression. You can make it spooky, cheeky, grumpy, or full Halloween goblin energy. No judgment here. Sometimes the wonky faces are the best ones.
If you enjoy making small crochet toys, you may also like browsing the Crochet Amigurumi patterns on CraftBits, especially if you are after more small plush-style projects. For another cute character-style make, try the Amigurumi Kawaii Bunny pattern, or for something a bit silly and stash-busting, the Amigurumi Bubble Leg Monster is a fun one too.
This pattern is written in US crochet terms.
This is a fan-inspired crochet project and is intended for personal use only.
What You Need
Purple yarn, approximately 1 skein
Size F / 3.75 mm crochet hook
Red wool roving
White wool roving
Black wool roving
Felting needle
Sewing needle
Polyester fiberfill stuffing
Stitch marker
Yarn needle
Scissors
A smooth worsted weight yarn works nicely for this project, especially if you want the shaping to show clearly. If you are buying supplies, this is the kind of small amigurumi project where a basic purple acrylic yarn and a good 3.75 mm crochet hook are perfectly fine.
No need to raid the fancy yarn shelf unless you really want to. Save that for the project you’ll swear you’re starting “next weekend.”
If you are adding supply links, this is a natural place to mention basic crochet hooks, purple acrylic yarn, stuffing, felting needles, or wool roving from Amazon or Mary Maxim, since those are practical supply sources for yarn, crochet tools, and general craft materials.
Abbreviations
MR – magic ring
ch – chain
sl st – slip stitch
sc – single crochet
inc – increase, work 2 sc into the same stitch
inc3 – work 3 sc into the same stitch
dec – single crochet decrease over 2 stitches
dec2 – decrease over 3 stitches
st / sts – stitch / stitches
FO – fasten off
Pattern Notes
Work in continuous rounds unless otherwise stated.
Use a stitch marker to mark the first stitch of each round.
When the pattern says “sc around,” work 1 sc into each stitch around.
Stuff the body firmly, but do not overstuff the arms, legs, ears, or tail.
The legs and tail help the finished plush stand upright, so attach them carefully and test the balance before sewing everything down completely.
For a neater finish, use an invisible decrease where possible. This helps reduce gaps, especially around the lower body where the stuffing can sometimes peek through.
This crochet plush is not intended as a toy for very young children, especially because the facial details are needle felted.
Body and Head
Using purple yarn.
Round 1: Work 5 sc into a magic ring. (5)
Round 2: Inc in each of the first 4 sts, inc3 in last st. (11)
Round 3: Inc, sc 1. Repeat 5 times. Inc. (17)
Round 4: Sc 2, inc, sc 3, inc, sc 2, inc, sc 3, inc, sc 2, inc. (22)
Round 5: Inc, sc 3, inc, sc 4, inc, sc 3, inc, sc 4, inc, sc 3. (27)
Round 6: Sc 2, inc, sc 4, inc, sc 5, inc, sc 4, inc, sc 5, inc, sc 2. (32)
Round 7: Sc 3, inc, sc 7, inc, sc 7, inc, sc 7, inc, sc 4. (36)
Round 8: Sc 6, inc, sc 8, inc, sc 8, inc, sc 8, inc, sc 2. (40)
Round 9: Sc 9, inc, sc 12, inc, sc 13, inc, sc 3. (43)
Round 10: Sc 1, inc, sc 13, inc, sc 13, inc, sc 13. (46)
Round 11: Sc 17, inc, sc 22, inc, sc 5. (48)
Round 12: Sc 16, inc, sc 31. (49)
Round 13: Sc 41, inc, sc 7. (50)
Rounds 14–18: Sc around. (50)
Begin stuffing the body and head firmly.
Round 19: Sc 16, dec, sc 32. (49)
Round 20: Sc 40, dec, sc 7. (48)
Round 21: Sc 6, dec, sc 22, dec, sc 16. (46)
Round 22: Sc 13, dec, sc 14, dec, sc 13, dec. (43)
Round 23: Sc 7, dec, sc 12, dec, sc 13, dec, sc 5. (40)
Round 24: Sc 6, dec, sc 8, dec, sc 8, dec, sc 8, dec, sc 2. (36)
Round 25: Sc 4, dec, sc 7, dec, sc 7, dec, sc 7, dec, sc 3. (32)
Round 26: Sc 4, dec, sc 5, dec, sc 4, dec, sc 5, dec, sc 4, dec. (27)
Round 27: Sc 2, dec, sc 3, dec, sc 4, dec, sc 3, dec, sc 4, dec, sc 1. (22)
Round 28: Sc 2, dec, sc 2, dec, sc 2, dec, sc 3, dec, sc 2, dec, sc 1. (17)
Round 29: Dec, sc 1, dec, sc 1, dec, sc 1, dec, sc 1, dec, sc 1, dec, sc 1. (11)
Round 30: Dec 4 times, dec2. (5)
FO, leaving a tail. Thread the tail through the remaining stitches, pull closed, and weave in the end.
Legs
Make 2.
Using purple yarn.
Round 1: Work 5 sc into a magic ring. (5)
Round 2: Inc in each st around. (10)
Round 3: Sc 3, inc3, sc 4, inc3, sc 1. (15)
Round 4: Sc 4, inc, sc 6, inc, sc 2. (17)
Round 5: Sc 1, inc, sc 3, inc, sc 3, inc, sc 6. (20)
Rounds 6–10: Sc around. (20)
Halfway through Round 10, place a stitch marker. Continue working to the end of the round.
Row 11: Ch 1, turn. Sc across until you reach the stitch marker.
Row 12: Ch 1, turn. Sc across to the next marker.
FO, leaving a long tail for sewing.
Lightly stuff the legs. Position them at the lower front of the body so the plush can stand. Pin both legs in place before sewing.
This is one of those moments where it is worth taking the extra minute, because once the legs are sewn on crooked, your little Gengar may look like he has just come home from a very long night out.
Sew securely.
Arms
Make 2.
Using purple yarn.
Round 1: Work 5 sc into a magic ring. (5)
Round 2: Inc in each st around. (10)
Round 3: Sc around. (10)
Round 4: Sc 1, inc. Repeat around. (15)
Rounds 5–6: Sc around. (15)
Row 7: Sc 10, ch 1, turn.
Row 8: Sc 10 back to the original marker.
Row 9: Ch 1, turn, sc 10.
FO, leaving a long tail for sewing.
Lightly stuff the arms if desired. Sew one arm to each side of the body.
Tail
Using purple yarn.
Round 1: Ch 3, join with a sl st to form a ring. Work 3 sc into the ring. (3)
Round 2: Inc in each st around. (6)
Round 3: Inc, sc 5. (7)
Round 4: Inc, sc 6. (8)
Round 5: Inc, sc 7. (9)
Round 6: Inc, sc 8. (10)
Round 7: Inc, sc 9. (11)
Round 8: Inc3, sc 10. (13)
Round 9: Inc3, sc 12. (15)
Round 10: Inc3, sc 14. (17)
Round 11: Inc3, sc 16. (19)
Round 12: Sc 1, inc3, sc 16, inc. (22)
Round 13: Sc around. (22)
FO, leaving a long tail for sewing.
Stuff the tail lightly. Sew the tail to the rounded back/bottom area of the body. The tail should help support the plush so it can stand with the legs.
Before fastening it completely, set the plush on a flat surface and check the balance. Adjust the angle if needed.
Ears
Make 2.
Using purple yarn.
Round 1: Ch 3, join with a sl st to form a ring. Work 3 sc into the ring. (3)
Round 2: Inc3, sc 2. (5)
Round 3: Inc3, inc, sc 3. (8)
Round 4: Inc, sc 7. (9)
Round 5: Inc, sc 8. (10)
Round 6: Inc, sc 9. (11)
Round 7: Inc, sc 10. (12)
Round 8: Inc3, sc 11. (14)
Round 9: Inc3, sc 13. (16)
Round 10: Sc around. (16)
FO, leaving a long tail for sewing.
Do not stuff the ears. Flatten them slightly and sew them to the top of the head, angling them outward.
Face
Use white, red, and black wool roving to needle felt the face onto the front of the body/head.
For a classic cheeky ghost-style face, add:
White angled eyes
Red eye details, if desired
A wide black mouth
White teeth or grin details
Take your time with the face. This is where the whole personality of the plush comes together.
If you are new to needle felting, start with very small amounts of wool roving and build up the shapes slowly. It is much easier to add more than to pull away a giant felted blob that has somehow become one with the crochet.
Assembly
Sew the legs to the lower front of the body.
Sew the tail to the back/bottom of the body so it helps balance the plush.
Sew the arms to each side of the body.
Sew the ears to the top of the head.
Needle felt the face onto the front.
Check that the plush stands. If it leans forward or sideways, adjust the tail or leg position before fully securing the stitches.
Weave in all remaining ends.
Your Gengar-inspired crochet amigurumi is finished.
This is such a fun little project for Halloween decorating, gamer gifts, desk buddies, or anyone who loves a slightly spooky handmade plush. It is also a good pattern for using up a single skein of purple yarn, which is handy if your yarn stash has reached that “I swear I had a plan for this colour” stage.
For more small crochet toy ideas, browse the Amigurumi projects on CraftBits or try another character-style pattern like the Amigurumi Wag Woof Puppy.